
I recently bought a condo in Maryland for my personal residence. It only had one owner since it was built in the ’80s, and many things in the condo were clearly still from the original build! It’s been a great opportunity to exercise my DIY muscles, especially while there’s not much else to do in the pandemic.
One of the projects I decided to tackle was refinishing the bathroom sinks. They were original cultured marble, complete with some lovely yellowing with age (it’s hard to get quite the full sense of it from the before photo, but trust me, it was pretty yucky). I had seen our contractors achieve great results doing this with sinks and bathroom tile in our rental properties, so I figured I’d give it a shot myself and save some money by not having to purchase new vanity tops. (I also raised the vanities from 30″ to 36″ – you can see how that project went here!)
I’m not going to give a full DIY tutorial here, since many others have done a great job on that! I primarily followed a tutorial by Bless’er House, a youtube video by Kelly Concepts, and found additional great tips on Sage Cottage Architects. Definitely check those out if you are thinking of taking on this project! (The latter two links are tub refinishes, but it’s the same idea. I also did the tile around my tub/shower, so stay tuned for a post on that as well!)
I did, however, find that I ran into some surprises and questions that I hadn’t seen answered online, so I wanted to share my own experience and tips.
First off, supplies:
- The product: I used the Rustoleum Tub & Tile refinishing kit, available in home improvement stores or on Amazon (though I’ve found that the only place I can get the small Tub & Tile repair kit for a reasonable price right now is Lowe’s). It’s an epoxy paint kit that comes in two parts that you mix together and paint on when you are ready to go. The Rustoleum kit certainly seems to be the most popular for this application, though you could also check out products from companies like Stone Coat Countertops. I was able to do two small vanity tops with one Rustoleum kit.
- The tools: I took some time researching to figure out which brushes and rollers would work best, and ended up being happy with my choices. I used a small Wooster Shortcut brush and 1/4″ nap shed resistant roller heads from Home Depot. The brush seemed high quality and performed well, and at under $6 it’s not a big deal that you have to throw it away afterward (epoxy is a mess!!). The rollers were excellent in that I had NO issues with them falling apart midway through the application (and my coats spanned the full 6 hours of the epoxy’s workable time) as others have reported with cheaper rollers. Finally, make sure you have a respirator mask! The smell is strong – you’ll start to feel lightheaded pretty quickly without one.
Now, onto my experience…
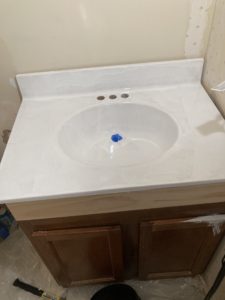
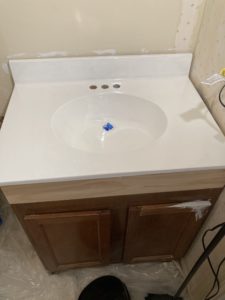
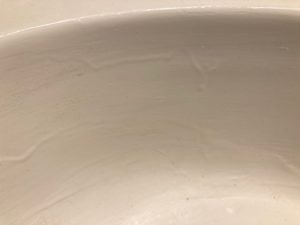
The first thing that surprised me was that my first coat was REALLY THIN and runny. I mixed the product for the full recommended time, but I was just using a paint stirrer, and I suspect that if I had used a powered mixer the result would have been slightly different. The below left photo shows the first coat and you can see how thin it is, compared to the right photo after the second coat. The “paint” was also much thicker and easier to apply on the second coat, and I don’t know if that’s because it had more time to “set” (I did an hour between coats), or because I was getting down to the thicker part of the can. If I did this again, I’d probably both use a powered mixer and wait a beat before applying the first coat.
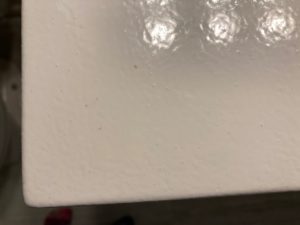
The next thing I found is I did get bubbles (and they didn’t go away like the instructions said they would)! If you look closely at the picture on the left in the next set of pictures below, you can still see bits of them in the finished product. I did figure out one trick to help minimize the effect of the bubbles – they will form little hills in the finish, but if you wait until after a half hour or so when the paint is mostly dry to the touch, you can press down those little bubble hills with something like an index card. I was able to flatten them all out and even get some of them to disappear!
Another thing I learned is that it doesn’t work very well to go back and redo a section within the same coat. In the below right photo you can see faint lines where I had run my roller across the front of the counter again because I saw that there were a couple of thinner spots there. With this stuff, you really need to get a full coat on quick, and then don’t really touch it again. That way everything smooths and levels together. If one spot needs more, you really should wait and do another full coat.
From these photos you can also see how there’s a bit of an orange peel texture to it – not sure if I used the roller too much (again, you need to get it on quick and then leave it alone so it can smooth and level) or if it would have been different with a different roller.
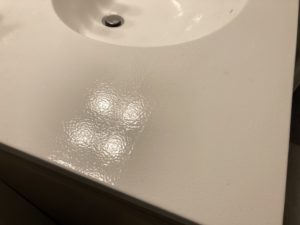
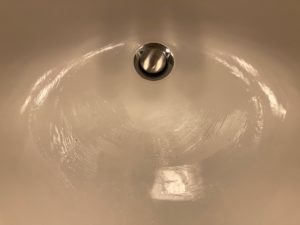
It got even more challenging … actually painting the sloped sink basin was quite difficult. It’s a balance of applying the paint thick enough to get coverage, but not so thick as to cause it to drip. It’s extra difficult because the drips will form slowly, and generally not become visible until past the time that you would be able to correct them without making your finish uneven (as I explain above). I have quite a bit of experience painting and doing fine detailed work with my hands, and I found it next to impossible to get a good clean job on this. The photo on the left here shows the worst drip I got, and on the right you can see the variation in sheen that resulted from me going back and trying to touch up just parts of the basin.
So, while I think I saved around $200 (and learned a lot!) by doing this project, in the end I think I should have listened to those who recommended against it. I’m not sure it was really worth the time and effort, and the results aren’t great. I’m going to try and buff out some of the imperfections with a very fine grit sand paper, and will report back on how that goes!
Some final comments and tips:
- This is really difficult if you have a pet in the house! I found it nearly impossible to prevent stray floating dog fur from landing in the paint, especially because I needed to run fans to ventilate. Thoroughly clean the room before you start, and consider sealing off the doors to prevent any from getting in!
- Always make sure to fully read the product’s instructions!
- After two coats, I could tell I needed a third, but the instructions say to wait 24 hours before applying a 3rd (which requires a new kit!). I had paint left and didn’t want to spend the extra time or money just for a third finishing coat, so I decided to go rogue and apply a third coat an hour after the second. No obvious issues have arisen from this yet, but time will tell I guess… Maybe if I had managed to get a thicker first coat, I would not have needed a third coat.
- Acetone (nail polish remover) worked really well for cleaning up paint I got on the sink drain (I was unable to remove the drain – I tried taping it off but that felt like a waste of time because it was quite difficult to be precise, and paint ended up running under the tape anyway. Next time I’d just do a quick and dirty tape job and just touch up with acetone)
- This would be much easier and the results would be better with a sprayer!
Thanks for reading and feel free to add questions or comments below!
Pingback: Home Improvement Solutions: Raising a Vanity | We buy houses in Brenham | Local, easy, sell your house fast